
Our New Kitchen - Before and Afters!
/
Hello friends!
It’s been awhile since I’ve been over here on my blog! Can you believe that we’re already in June? Where has the year gone?
Today is the day that I finally get to show you some BEFORE and AFTERS of our new kitchen in Tampa. If you remember, we bought this fixer-upper house in Aug, of 2021. The kitchen was especially needing a facelift. It had vinyl cabinets (you know…the kind they used in the 70’s) which were falling apart. The appliances needed to be replaced along with the countertops and floors.
In fact, just today while making coffee- I thought, “This kitchen has come a long way!” I mean….just look at these BEFORE pics of when we purchased this home.


We knew this kitchen needed to be gutted! So…we decided to work with a local design company that specializes in kitchen remodels instead of tackling this project ourselves for several reasons. 1. We are new to the area and are not familiar with reputable plumbers, sheetrock installers, and other handymen. 2. This company has connections where they can get products faster than if we did it ourselves. The entire renovation lasted 2 1/2 months - which is actually quick in this market.
Here is the kitchen design that this company did for us.


Here are some of the main things that we planned to do in this kitchen:
Take out the closet next to the original fridge and move the fridge over to the side of the wall.
Add more upper cabinets along the wall next to the fridge.
Take out part of the wall that is extending but not touching the ceiling in the angled area.
Utilize the angle of the kitchen by placing the oven in that area and building a large range hood above it.
Take out the cabinets on the back wall and add open shelves.
Move sink and dishwasher over.
Add quartz with a waterfall island.
Convert laundry area to a walk in pantry.
Add cabinets/counters for a coffee bar next to sliders.
The plans show a built in smaller island. We will take that out to save money and replace it with a rolling table that we already own.
Oftentimes, we skip process pics because they are not glamorous. However, I’m showing you a few so that you can appreciate the after pics!


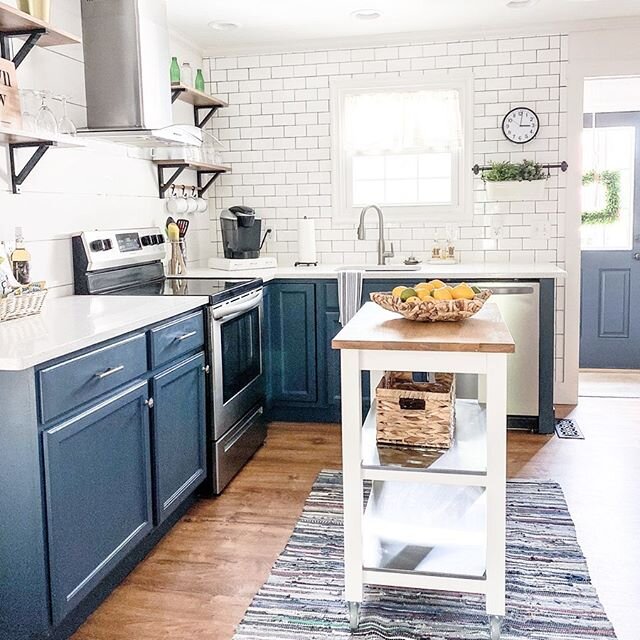
Now, here is the AFTER!!

We used Innovation Cabinetry in Pearl White (similar color to SW Alabaster White) with shaker doors.
Our floors are from a local flooring company. We used a Rigid Core LVP flooring in the color Warm Gray. They are 9” x 60” - we wanted floors that were a bit wider than the average size.
We installed new stainless steel Samsung appliances.
The walls are painted SW Alabaster and the ceilings are SW Pure White. Did you notice that we removed the popcorn ceilings and also the fan that was in the kitchen, too?

We had this kitchen bar cart in our MD house. I eventually want to find a wooden table for this spot but this works for now!
The vinyl floor mat is easy to clean and adds color in this neutral kitchen which I love!

I waffled back and forth on the backsplash tile…but finally decided on Cloe - 5 x 5 in white. I did an offset pattern and I love it! The tiles are a mixture of shades of white and the gloss on the tile makes it easy to clean and brings dimension into our kitchen.

We hid our microwave in this pull out drawer. If you use your microwave a lot, I probably wouldn’t recommend you doing this. However, we rarely use our microwave so this works for us.
We also took out the cabinets above the counters and replaced them with shelving (color: gray).

We added two floating shelves on each side of our range hood. I’m thinking of adding one more on each side but it would have to go lower and I’m not sure if I want to drill through our beautiful backsplash!

This little coffee bar/drink station is one of my favorite things we added in this kitchen. We use this beverage cooler to hold our waters, seltzers, sodas, etc. It’s nice because we can grab a drink before heading to the pool! (The toaster and coffee maker look so happy here…wouldn’t you agree?)

I love the look of antique bronze hardware - especially next to white cabinets. The knobs are so pretty, too!

Here is a close up of our countertops. It’s called Calcutta Gold quartz (Silestone). We also used this same look in our master bathroom using porcelain tile on the floor.

We have a pull out trash can in our kitchen next to the sink, but we also have another trash can closer to the door. This is convenient because it is right near our beverage station and lanai.

I still need to work on better organization in this pantry area but I’m happy we took the laundry room out of the kitchen.

I recommend drawers in kitchens! Perfect for storing platters and bowls. My new kitchen has SO many drawers - which I love!

This sink is from Costco. It is a great price and includes the stainless steel sink, mat, cutting board (shown in other pics) and faucet.


These barstools are super comfortable and the black and rattan tie in the rustic flair. I found them at a thrift store. :-)
The hanging pendant lights are from Restoration Hardware outlet. Here is something similar.
Key things I learned through this renovation process:
Be present when things are being installed. We learned the hard way with this lesson as our countertops were being installed while we were out of town. There was a miscommunication with the contractor and he installed an outlet in the waterfall island. We understand that an outlet has to be installed but there are ways to avoid it going in right there. We possibly could have helped to resolve this if we were in town during the installation. Overall, it is not the worst thing in the world but I would still recommend you are present when you’re doing big installations (lights, floors, cabinets, etc).
Don’t be afraid to speak up. I am not one who likes to cause conflict, however, I learned that my voice and opinion matters - especially if I have things in mind that I like. For example, our contractor had a strong opinion on what we should use for backsplash tile. I liked it but didn’t love it so I finally spoke up and had them change it to what I really wanted. So…lesson learned…speak up as this is YOUR space! You want to LOVE it - not just like it!
I wish I would have done more customizable cabinets (for appliance storage). The reason I didn’t was because everything is on back order but if you can do this…I think it’s worth it!
Some things can wait. We saved quite a bit of money by waiting on installing the smaller island in the middle of our kitchen. We already had this kitchen cart and until we find something else - it works great! I am also waiting right now on purchasing new bar stools. Remember: Making your home feel cozy and inviting takes time!
That leads me to the last lesson…Be Patient! Renovating a home takes a lot of patience and if you’re planning to renovate your kitchen - while living in your home - you will need LOTS of patience! Just know that things will get delayed and there’s nothing you can do about it. So, stay patient!
Looking at our kitchen now…I can’t even believe how it used to look. I’m thankful for the many workers and contractors who helped up finish this project for us. I’m so grateful!
Let me know if you have any questions regarding any of this information. If you’re looking to remodel your kitchen in the near future - I’m here to help you with what I’ve learned!
Enjoy your summer, friends!